THE CHASE OF THE BISMARCK
By Josķ M. Rico
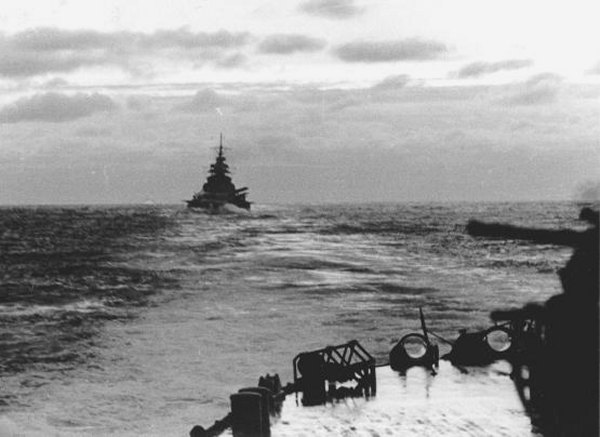 Bismarck astern of Prinz Eugen in the morning of 24 May after the battle of the Denmark Strait.
L³tjens Options.
After the battle in the Denmark Strait, the German ships continued on a south-western course. At this time L³tjens had two main options. The first was to return to Norway and the second to carry on into the North Atlantic. Today most people agree that, if at all possible, L³tjens should have destroyed or at least disabled the already damaged Prince of Wales, then turn around, and head for Trondheim, via the Denmark Strait. L³tjens could also have taken a shorter path to Bergen, via the Faeroes-Iceland passage, although the chances of being intercepted by Tovey's battle group (King George V, Repulse, and Victorious) coming from Scapa Flow were greater as well. Instead, the German Admiral opted not to pursue the Prince of Wales (apparently against Captain Lindemann's suggestions) and headed for the Atlantic. At 0801, Admiral L³tjens sent a series of messages to Group North informing of his intention to take Bismarck to Saint-Nazaire for repairs. The Prinz Eugen, which was undamaged, would stay in the Atlantic to attack enemy convoys on her own.
The decision to head for Saint-Nazaire shows that after a survey of the damage sustained, L³tjens had correctly decided to cancel Operation Rhein³bung at least temporarily until the Bismarck could be repaired in port. But, why did he choose Saint-Nazaire? The French port was farther than Norway and it required greater fuel expenditure. L³tjens probably thought France was the best place to resume the battle of the Atlantic as soon as possible following Raeder's wishes. In fact, he had successfully entered Brest with Scharnhorst and Gneisenau a couple of months earlier.
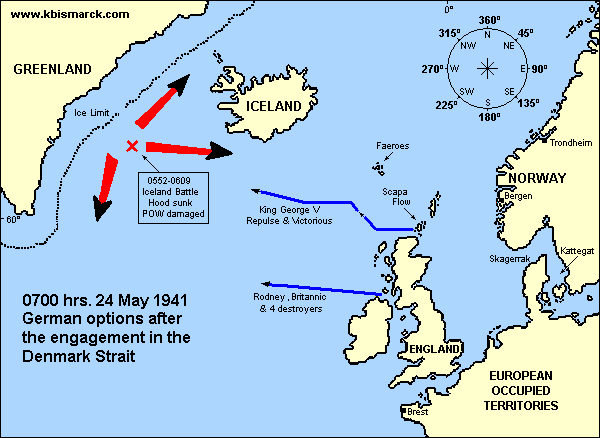
At 0950, Captain Brinkmann was informed by semaphore of the damage received by Bismarck:
"Commander to Commander, for your information. I have received two heavy strikes. One in section XIII-XIV. Hence, loss of electric plant No. 4, boiler room portside is taking on water that can be contained. Second hit in section XX-XXI in forward ship section. Penetration portside, exit starboard above the armoured deck. Third strike through a boat, without consequence. Otherwise I am fine. 5 light casualties."Twenty minutes later, L³tjens ordered the Prinz Eugen to take up position aft of Bismarck temporarily in order to ascertain the severity of her oil loss. By 1100, the Prinz Eugen resumed her previous position in front of the battle group. The three British pursuing ships, now under command of Rear-Admiral Wake-Walker, were still shadowing the Germans; the Suffolk from the starboard quarter, and the Norfolk with Prince of Wales from the port quarter. At noon, the German command transferred the operative control of Operation Rhein³bung from Group North to Group West, and at 1240 Bismarck and Prinz Eugen set a new course of 180║ due south at 24 knots.
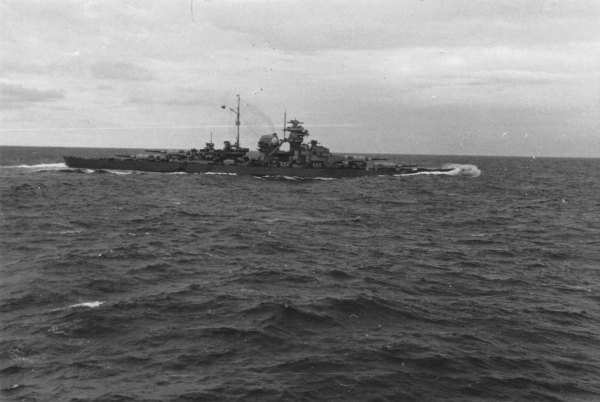
The Bismarck seen from the Prinz Eugen in the morning of 24 May after the battle of the Denmark Strait.
Dispositions made by the British Admiralty.
Three hours after the sinking of the Hood, the British Admiralty issued the following announcement to the press:
"British naval forces intercepted early this morning, off the coast of Greenland, German naval forces, including the battleship Bismarck.The unexpected loss of the Hood caused enormous indignation in London, and the Admiralty began to divert all available warships from their original missions in order to join in the chase for the Bismarck. This meant leaving most convoys that were at that time crossing the Atlantic unescorted.
The enemy were attacked, and during the ensuing action H.M.S. Hood (Captain R. Kerr, C.B.E., R.N.) wearing the flag of Vice-Admiral L. F. Holland, C.B., received an unlucky hit in the magazine and blew up.
The Bismarck has received damage, and the pursuit of the enemy continues.
It is feared there will be few survivors from H.M.S. Hood."
The battleship Rodney (Captain Frederick H. G. Dalrymple-Hamilton) was at sea to the west of Ireland on her way to Boston for repairs with destroyers Somali, Tartar, Mashona, and Eskimo of the 6th Flotilla. They were escorting the liner Britannic (27,759 tons) now used as a troop transport. The Admiralty ordered Rodney to operate against Bismarck and at 1036 hours on the 24th signalled: "If Britannic cannot keep up, leave her behind with 1 destroyer." Therefore Rodney and destroyers Tartar, Mashona and Somali left Britannic with destroyer Eskimo at noon. The battleship Ramillies (Captain Arthur D. Read) to the South of Cape Farewell was also instructed to leave the convoy she was escorting (HX-127) and "proceed so as to make contact with enemy from westwards, subsequently placing enemy between Ramillies and C.-in-C".1 In addition, the battleship Revenge (Captain Ernest R. Archer) in Halifax was ordered to put to sea, and she left port at 1500, then headed east.
The Prinz Eugen is Detached.
Early in the morning of 24 May, Admiral L³tjens had already decided to detach the Prinz Eugen, and at 1420 sent a semaphore signal to Captain Brinkmann:
½Intend to shake stalker as follows: During rain squall, the Bismarck will change course west. Prinz Eugen will maintain course and speed until he is forced to change position or three hours after the departure of Bismarck. Subsequently, is released to take on oil from "Belchen" or "Lothringen". Afterwards, pursue independent cruiser war. Implementation upon cue word, "Hood".╗This was to be a diversionary manoeuvre in which the Bismarck had to distract the British ships long enough to let the Prinz Eugen escape. Meanwhile, Vizedmiral Karl D÷nitz had ordered the U-boat force a complete cessation of operations against merchant shipping in order to support the Bismarck. At this time L³tjens urged D÷nitz on a radio telegram to assemble his U-boats in quadrant AJ 68 (54║ 09' North, 42║ 15' East). His intention was that Bismarck would be able to lead the British pursuing ships into a trap the next day. Therefore D÷nitz stationed several U-boats (U93, U43, U46, U557, U66, U94) in the given area to the South of the southern tip of Greenland. At 1540, the German battle group entered a rain squall, and the execution order of "Hood" was given. The Bismarck turned to starboard at 28 knots, however the Suffolk was shadowing very close from the starboard quarter and the manoeuvre failed. Therefore, at 1600 the Bismarck resumed her position on Prinz Eugen's wake. Two hours later, at 1814, the Bismarck turned to starboard at high speed again. This time the manoeuvre was successful and the Prinz Eugen maintained her course and left the formation. The Bismarck closed on the Suffolk, and at 1830 opened fire from 18,000 metres (19,685 yards), but the cruiser quickly retired under a smoke screen. Subsequently, the Bismarck became engaged with the Prince of Wales at long distance, and after an exchange of salvoes the fire ceased at 1856. After this action, in which no hits were scored by either side, the Suffolk joined the Norfolk and the Prince of Wales back to the port side of the Bismarck, probably to avoid being surprised by the German battleship if she decided to reverse her course again. However, this left Bismarck's starboard side open. The British would pay a high price for this manoeuvre just a few hours later, but before this they would still have an opportunity to attack the Bismarck.
The fuel situation aboard Bismarck had become serious, and at 2056, L³tjens informed Group West that, due to fuel shortage, he was to proceed directly to Saint-Nazaire. In fact, at this time the Bismarck had less than 3,000 tons of fuel-oil available, and unless some of the 1,000 tons of fuel blocked under the forecastle could be retrieved, the battleship would be forced to slow down in order to reach the French coast. Had Bismarck been refuelled in Bergen on 21 May, now she would have some 1,000 tons more of additional fuel available. That would have given Bismarck more freedom of movement and would have enabled L³tjens to make a diversionary manoeuvre to try shake off his pursuers. But the reality was that the fuel shortage hampered the original idea to drive the pursuing British forces into the western U-boat screen, and it forced Bismarck to follow a steady course to France. As a result of this change of plans, all available U-boats in the Bay of Biscay were now ordered to form a patrol line to cover Bismarck's new expected course.
Attacked by Swordfish Torpedo Planes.
At 1509, Admiral Tovey had detached Rear-Admiral Alban Curteis (in Galatea) with the carrier Victorious (Captain Henry Cecil Bovell) and the four light cruisers Galatea, Aurora, Kenya and Hermione to close the range and deliver a torpedo attack. At the time, the Victorious had a reduced air wing of only nine Fairey Swordfish torpedo bombers (the so-called "Stringbags") and six Fairey Fulmar fighters available. Three of the Swordfish were equipped with new ASV (Air-to-Surface Vessel) radar sets. At 2210, some 120 miles away from Bismarck, the Victorious launched all the torpedo bombers of the 825th Squadron under the command of Lieutenant-Commander (A) Eugene Esmonde.2 At 2300, they were followed by three Fulmars of the 800Z Squadron, and at 0100 by two more to maintain touch. Esmonde obtained a surface contact on his ASV radar at 2350, and prepared his aircraft for the attack, but instead of Bismarck he found the US Coast Guard Cutter Modoc (Lieutenant-Commander Harold Belford) that happened to be on patrol in the area. The Bismarck, only six miles away, spotted the British aircraft and opened fire immediately while increasing the speed to 27 knots.
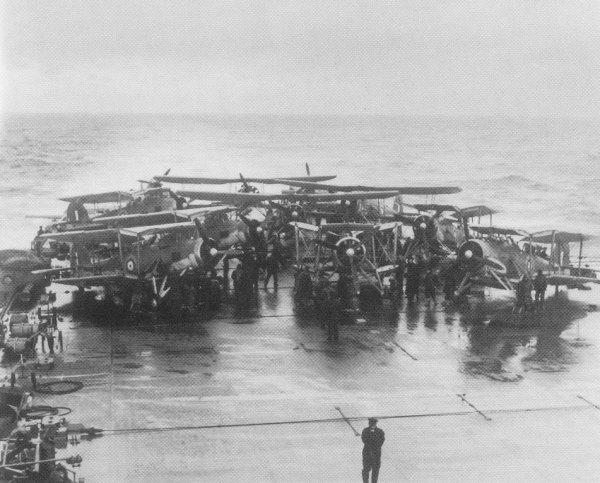
The flight deck of HMS Victorious on 24 May 1941.
This photo shows the strike group being arranged on deck several hours before the launch against the Bismarck.
All nine Swordfish of 825th Squadron are clearly visible as well as, in the extreme rear, two Fulmars from 800Z Flight.
One Swordfish lost contact with the rest of the squadron in a cloud layer, and only eight planes proceeded to attack around midnight. Torpedoes had been armed with duplex pistols and set to a depth of 31 feet, speed 40 knots. The German anti-aircraft fire was very intense and even the main and secondary batteries opened fire. Lindemann and the helmsman, Hans Hansen, operating the press buttons of the steering gear, successfully avoided the first six torpedoes when suddenly the battleship was hit. An 18-inch MK XII torpedo3 struck Bismarck's starboard side, amidships, at the level of the main belt which resisted the explosion very well. The damage was minimal, although Oberbootsmann Kurt Kirchberg who was standing on the starboard side was thrown by the blast and killed, thus becoming the first casualty aboard. Six other men were injured. Air Gunner Leslie D. Sayer, in the back seat of Swordfish 5F, later recalled:
"I saw what I thought was a hit because there was a huge spurt of water coming from the hull of the Bismarck, and I thought to myself, that's us and that's our hit."
 The Bismarck photographed from a Swordfish of the 825th Squadron on 24 May.
After the Swordfish attack, the Bismarck reduced her speed to 16 knots to alleviate the pressure in the forecastle and carry out repairs. The distance between both forces decreased, and at 0131 hours, the Prince of Wales opened fire on Bismarck. The battleships exchanged two salvoes each at a range of 15,000 metres (16,400 yards), but due to the poor visibility neither side scored any hits. The morale aboard the Bismarck was high, it was L³tjens' 52th birthday and sometime about then, the crew wished the Chief of Fleet a happy birthday by the ship's loudspeaker system.
Admiral L³tjens Makes His Move.
All three British ships that were shadowing the Bismarck from the port quarter had begun to zig-zag in case of a possible U-boat attack. Shortly after 0300, taking advantage of the enemyÆs disposition and the darkness, L³tjens saw his opportunity to break the contact with his pursuers. The Bismarck increased her speed to 27 knots and turned to starboard, in a manoeuvre very similar to the one executed the previous afternoon when the Prinz Eugen was detached. Finally, the Bismarck succeeded in breaking contact and after turning almost a complete circle, she established a new course of 130║ due southeast, to Saint-Nazaire. The British ships tried in vain to re-establish contact with the Bismarck, and at 0401 the Suffolk reported: "Enemy contact lost."
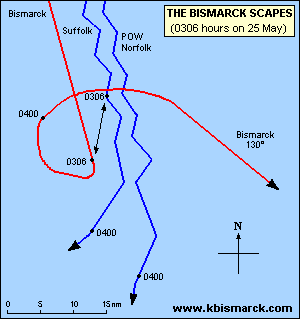 Vice-Admiral Wake Walker's order to change the position of Suffolk in the afternoon of 24 May now had its consequences.
It gave the Bismarck room to manoeuvre, and L³tjens did not waste this chance to run away.
With the Suffolk stationed on Bismarck's starboard quarter, it would have been much more difficult for the German battleship to break contact.
Nevertheless, on board the Bismarck for some reason they did not realize that the contact had been broken, and at 0700 Admiral L³tjens radioed to Group West: "One battleship, two heavy cruisers keeping contact." Shortly after 0900, L³tjens sent another long message to Group West:
"Possession of radar equipment by enemy, effective range at least 35,000 metres, adversely affects to the highest degree the operations in the Atlantic. Ships were located in the Strait of Denmark in dense fog and were continuously tracked. Disengagement failed even in favourable weather conditions. Oil replenishment is generally no longer possible, if disengagement of enemy cannot be accomplished with higher speed. Running battle between 20,800 and 18,000 metres. Opponent "Hood" concentrates fire on "Bismarck". After 5 minutes, "Hood" is destroyed by an explosion; thereafter, change of target to "King George" who then turns away in black smoke caused by definitively observed hits. He remains out of sight for several hours. Own munition expenditure: 93 rounds. Later, "King George" took on the fight only at extreme distances. "Bismarck" received two hits from "King George"; of those one hit below the side armour belt at section 13 to 14. Hit in section 20 to 21 impaired speed and caused a 1║ bow burying forward and destruction of oil cells. Release of "Prinz Eugen" possible by battleship engaging cruisers and battleship in fog. Own EM-2 radar instrument prone to failures, especially during firing."Neither message reached Group West until well after 0900. Ironically, Group West had previously sent (at 0846) a message confirming that the British had lost contact. After this, Bismarck kept strict radio silence, but the British had already intercepted her signals allowing them to calculate her approximate position.
At 1152, L³tjens received a personal message from Admiral Raeder: "Heartiest Birthday Wishes! In view of your recent great armed feat, may you be granted many more such successes [as you enter] a new year of your life!" Minutes later, at noon, L³tjens delivered the following speech to the crew by the loudspeakers:
"Soldiers of the battleship Bismarck! You have achieved great fame! The sinking of the battlecruiser Hood does not only have a military, but also a morale [psychological] value [significance], because Hood was EnglandÆs pride. The enemy will now attempt to gather its forces and deploy them toward us. Therefore, I released Prinz Eugen yesterday noon so that he can conduct his own war on merchant vessels. He has accomplished to evade the enemy. By contrast, because of the hits we have sustained, we have received the order to head for a French harbour. The enemy will gather on the way and will engage us in battle. The German Nation is with you [in spirit] and we will fire until the barrels glow and until the last projectile has exited the barrel. For us soldiers [the battle cry] as of now is: ōVictory or death!öThe Admiral had tried to moderate the enthusiasm of the men by giving them a more realistic view of the situation, however, his speech had an unfavourable effect on the crew that somehow began to realize that everything was lost. The senior officers had to speak to their men in order to built up their morale again. Captain Lindemann himself made a brief address over the loudspeakers an hour later and succeeded in restoring the optimism.
At 1625, L³tjens received yet another message of congratulations, this time from Hitler: "I send to you today my very best congratulation for your Birthday!" That same afternoon, Bismarck's Chief Engineer, Korvettenkapitõn (Ing.) Walter Lehmann and several crewmen began to construct a dummy funnel. This would give the battleship two funnels and hopefully confuse the enemy, should Bismarck be detected again.4 During the night of 25/26 May, the Bismarck maintained her course and there were no incidents on board.
The Bismarck is Located.
In the morning of 26 May, as the Bismarck was approaching the French coast, the crew was ordered to repaint the top of the main and secondary turrets yellow. Hard job considering the state of the seas, nevertheless it was carried out although the yellow paint washed off at least once.
A few hours earlier, at 0300, two Coastal Command Catalina flying boats had taken off from Lough Erne in Northern Ireland on a reconnaissance mission in search for the Bismarck. At about 1010, Catalina Z of 209 Squadron commanded by Flying Officer Dennis Briggs sighted the German battleship that immediately answered with very accurate anti-aircraft fire.5 The Catalina jettisoned her four depth charges and took evasive action after her hull was holed by shrapnel. Then at 1030 signalled: "One battleship, bearing 240║, distance 5 miles, course 150║. My position 49║ 33' North, 21║ 47' West. Time of transmission 1030/26." Briggs would later describe the sighting as follows:
"'George' (the automatic pilot) was flying the aircraft at five hundred feet when we saw a warship. I was in the second pilot's seat when the occupant of the seat beside me, an American, said 'What the devil's that?' I stared ahead and saw a dull black shape through the mist which curled above a very rough sea. 'Looks like a battleship,' he said. I said: 'Better get closer. Go round its stern.' I thought it might be the æBismarck,' because I could see no destroyers round the ship and I should have seen them had she been a British warship. I left my seat, went to the wireless operator's table, grabbed a piece of paper and began to write out a signal. The second pilot had taken over from 'George' and gone up to 1,500 feet into broken cloud. As we came round he must have slightly misjudged his position, for instead of coming up astern we found ourselves right over the ship in an open space between the clouds. The first thing I knew about this was when two black puffs appeared outside the starboard side wing tip. In a moment we were surrounded by black puffs. Stuff began to rattle against the hull. Some of it went through and a lot more made dents in it. I scribbled 'End of message' and handed it to the wireless operator. In between the smudges of the bursting shells I looked down on the ship which seemed to me to be one big, winking flame. She was taking violent avoiding action by turning hard to starboard, heeling well over."After more than 31 hours since the contact was broken, the Bismarck had been located again. Unfortunately for the British, however, Admiral Tovey's ships were too far away from the German battleship. The King George V was 135 miles to the north, and the Rodney (with a top speed of 21 knots) was 125 miles to the northeast. They would never catch up with the Bismarck unless her speed could be seriously reduced.
Only the Force H, under the command of Vice-Admiral Sir James F. Somerville, sailing from Gibraltar, had a chance to intercept Bismarck. The battlecruiser Renown (Captain Rhoderick R. McGrigor) was in the best position, but having lost the Hood only two days earlier, the Admiralty did not allow Renown to engage the Bismarck unless she had already been heavily engaged by Tovey's battleships. The best hope for the British was to launch an air strike from the carrier Ark Royal. The Ark Royal had already launched 10 Swordfish at 0835 to try find the Bismarck, and once the report of the Catalina sighting arrived, the two closest Swordfish altered course to intercept. At 1114, Swordfish 2H located the German battleship too, followed seven minutes later by the 2F.6 Shortly afterwards two more Swordfish, fitted with long-range tanks, were launched to relieve 2H and 2F and keep touch with Bismarck.
The Swordfish Strike Again.
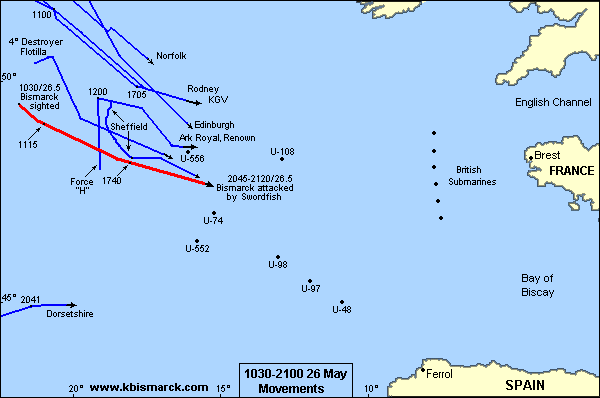
At 1450, fifteen Swordfish commanded by Lieutenant-Commander J. A. Stewart-Moore took off from the Ark Royal (Captain Loben E. Maund) to attack the Bismarck. At 1550, they obtained radar contact with a ship and dived to attack. The attack, however, turned out to be a failure since the ship sighted was actually the light cruiser Sheffield (Captain Charles A. Larcom) which had been detached from Force H to make contact with the Bismarck. Luckily for the British, the Sheffield was not hit by any of the 11 torpedoes launched because they had faulty magnetic pistols. Two torpedoes exploded upon hitting the water, three on crossing the cruiser wake, and the other six were successfully avoided. The Swordfish returned to the Ark Royal where they landed after 1700, but not without trouble because of the terrible weather conditions. The rise and fall of the stern was measured to be 56 feet, and three aircraft smashed their undercarriages against the flight deck. Shortly afterwards, at 1740, the Sheffield obtained visual contact with the Bismarck.
The British put every effort on one last attack. It would be dark soon, and they knew this was their last real chance to stop or at least slow down the Bismarck. If they failed again, the Bismarck would reach the French coast on the next day, since another air strike late at night was unlikely to succeed. Therefore, at 1915, another group comprised of fifteen Swordfish, mostly the same planes used in the previous attack, took off from the Ark Royal. This time, however, their torpedoes were fitted with contact pistols and set to run at a depth of only 22 feet.
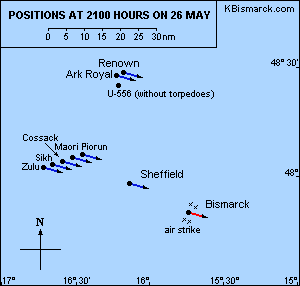 Meanwhile, the pursuing British forces had run across U556 (Kapitõnleutnant Herbert Wohlfarth) which sighted the Renown and the Ark Royal at 1948.
The German submarine was perfectly placed for an attack, but could not do so as it had no torpedoes left.
Wohlfarth had spent his last "fishes" on the ships of convoy HX-126 six days earlier south of Cape Farewell.
Therefore, U556 could only make signals reporting the position, course and speed of the enemy.
The Swordfish striking force, this time under the command of Lieutenant-Commander T. P. Coode, first approached the Sheffield to get the range and bearing to the Bismarck, and at 2047, began the attack. Bismarck's anti-aircraft battery opened fire immediately. During the course of the attack, the Bismarck received at least two torpedo hits. One torpedo (or two) hit the port side amidships, and another struck the stern in the starboard side somewhere between frames 10.5 and 14.5.7 The first hit did not cause important damage, but the second jammed both rudders at 12║ to port. The Bismarck made a circle and then began to steer northwest involuntarily into the wind. As before, none of the Swordfish were shot down although some were hit several times.8 The damage to Bismarck was so serious that at 2140, Admiral L³tjens sent the following message to Group West: "Ship unable to manoeuvre. We will fight to the last shell. Long live the F³hrer."
The impact in the stern area caused the flooding of the steering and other adjacent compartments. This meant that all repair attempts would have to be done under water. Divers were ordered to enter the steering compartment in order to free the rudders, but the violent movement of the water inside made this an impossible task. It was not possible to lower divers over the side due to the high seas. As an alternative, it was considered to blow the rudders away with explosives and try to steer the ship using the propellers alone, but the idea was rejected fearing that the explosion could damage the propellers. Kapitõnleutnant (Ing.) Gerhard Junack down in the Centre Turbine Room described the event:
"One torpedo which hit amidships caused no damage, but the second affected the rudders disastrously, jamming the port-side rudder at a 15║ angle. Immediately, the Bismarck became no longer manoeuvrable.
The torpedo-hit on the rudder shook the ship so badly that even in my zone of action in the turbine-room, the deck-plates were thrown into the air, and the hull vibrated violently. Shortly after the blow, water flooded through the port-side gangways into the turbine-room, and clouds of gas and smoke filled the room until the forced ventilation cleared it.
The stern compartments of the ship were now flooding, but the men who had been stationed there could still be saved, and soon the carpenters and repair-crew came through, making their way aft. But the ship pitched so violently in the strong sea swell that it was impossible to keep a foothold in the turbulent water surging through the companion-way.
All possibilities were now being considered to restore the ship's manoeuvrability - even if only temporarily. The Commander, Kapitõn zur See Lindemann, considered reports from Chief Engineer Lehmann, who was in continual contact with the repair and rescue teams. There was much gesticulation, and at one point the Chief Engineer stepped out of the circle, walked away, turned about, and made a sign of complete refusal. What this was about I am not certain, but eventually it was found possible to connect the hand rudder. But the old rudder would not budge, and to attempt to cut it away with underwater saws was quite impossible because of the heavy swell. A proposal to force the rudder out from below with the help of explosives was rejected, because of the proximity to the propellers. Thus all experiments with the auxiliary rudder were given up as completely hopeless, with the old one immovable."
Destroyers Attack Bismarck.
After the aerial torpedo attack, the new erratic course of the Bismarck caused her to close the range with the Sheffield. At about 2145, Bismarck opened fire on the Sheffield at a range of about nine miles. Bismarck fired a total of six salvoes and the British cruiser turned away to the north under the cover of a smoke screen. The Sheffield was not hit, but some splinters disabled her radar and injured twelve men of whom three died later.9 The turn caused Sheffield to lose contact with Bismarck, but at 2200, she made contact with the destroyers of the 4th Flotilla (Captain Philip L. Vian) Cossack, Maori, Zulu, Sikh and Piorun, and provided them with the approximate bearing and distance to the German battleship.
At 2238, the Polish destroyer Piorun (Commander Eugeniusz Plawski) sighted the Bismarck. The German battleship responded shortly thereafter with three salvoes. The destroyers proceeded to attack, but Bismarck defended herself vigorously in the dark. At 2342, splinters knocked down Cossack's antennas. The night was pitch black and shortly after midnight, star shells from the destroyers began to illuminate the area. The Germans, however, didn't use the ship's searchlights in order not to provide a good aiming point for the enemy. At about 0100, a star shell fell on Bismarck's bows starting a fire there that had to be extinguished by some crew members. Throughout the night the destroyers attacked the German battleship. These attacks were carried out in heavy seas, rain squalls and very low visibility, and no torpedo hits were obtained on Bismarck, that time after time repelled every attack with heavy and accurate fire from her main and secondary batteries. By 0700, a total of 16 torpedoes had been fired by the destroyers of the 4th Flotilla. Sunrise was at 0722 hours.
Footnotes:
1. Convoy HX-127 with 56 ships left Halifax on 16 May 1941 and arrived at Liverpool on 2 June 1941. The British SS Gravelines (2,491 tons), a straggler from HX-127, was torpedoed and sunk by U147 (Oberleutnant Eberhard Wetjen) on 31 May 1941.
2. Lieutenant-Commander (A) Eugene Esmonde died on 12 February 1942 when his Swordfish was shot down while attacking the German ships crossing the English Channel. For this action he was posthumously awarded the Victoria Cross.
3. The Mk XII torpedo had a weight of 730 kg (1,610 lbs) and a warhead of 176 kg (388 lbs) TNT. BismarckÆs underwater protection system was designed to resist TNT charges of at least 250 kg (550 lbs), and these small torpedoes could cause only minor damage.
4. This funnel was never erected.
5. Dennis Briggs was not at the controls of Catalina Z/209 at the time of the sighting. The man who actually sighted the Bismarck was the American US Navy Ensign Leonard "Tuck" Smith. The British only credited Briggs because he was the aircraft commander and didnÆt want it known that Americans were involved since they were still considered neutrals. Click here to read Smith post action report.
6. Swordfish 2H with S-Lt. (A) J. V. Hartley, A/S-Lieutenant P. R. Elias, and LA H. F. Huxley.
Swordfish 2F with Lt. (A) J. R. C. Callander, Lieutenant P. B. Schondfeldt, and LA R. Baker.
7. There has been much speculation as to whether the torpedo that hit Bismarck's stern came from the port or starboard side. However, the most recent analysis of the wreck seems to indicate that it struck the starboard side.
8. Four of the attacking Swordfish were damaged by splinters. Swordfish 4C in particular had 175 holes counted, and both pilot and air-gunner were wounded in the shoulder and thigh respectively, the observer being uninjured.
9. On board Sheffield, Ordinary Seaman David T. George died on 26 May 1941, Able Seaman Ambrose Ling died on 27 May 1941, and Able Seaman Raymond C. Taylor died on 28 May 1941. The destroyers of the 4th Flotilla had the following casualties: Leading Stoker Ernest R. Potter aboard Sikh died on 26 May 1941, Petty Officer John Palmer aboard Maori died on 31 May 1941, and Leading Seaman William F. Dawe aboard Zulu died on 2 June 1941.

Copyright ® 1998-2024 KBismarck.com

